
I am excited to be participating in the Fabri-Quilt New Block Blog Hop. The blog hop started on 31 August and ends today. Each participant will present a 12 1/2″ x 12 1/2″ block using 6 fat-eighth Fabri-Quilt fabric. When I designed this block, I did it without the actual Fabri-Quilt fabric. You can read about why I did not construct my block with the actual Fabri-Quilt fabric in my blog post dated 6 August 2015.
I wrote the tutorial and sewed the prototype with fabric from my stash. I tried to use fabric which were of colours as close to the actual Fabri-Quilt fabric as possible. This is my first time designing a block and writing a tutorial on my design. As I sewed the block, I photographed the process then I inserted the photos into my tutorial. However these photos did not show Fabri-Quilt fabric. After I have completed the tutorial, I sent the file to Yvonne of Quilting Jetgirl. She then sewed out my block (with Fabri-Quilt fabric) following my tutorial. As she went along, she photographed the whole process, just as I did. The photos that you see below are the photos that she had taken. I really think she did a very good job with the photography. She then sent me the photos that she took so that I could insert her photos (showing the sewing process with actual Fabri-Quilt fabric) into my tutorial.
Yvonne did more than just take the photos, she provided me with feedback and tips and even modified my step so as to make it easier to construct the block. Thank you Yvonne for helping this newbie here 🙂
I love scrappy blocks so I have included all the 6 Fabri-Quilt fabrics when designing this block. I also love chevrons so the block I designed is mainly made up of chevrons. By looking at the block, you will know why I have named it – Chevron among the chevrons
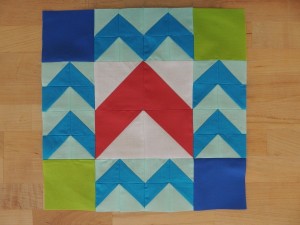
You can use different colour fabrics to construct the block. I have stitched out four 12 1/2″ x 12 1/2″ blocks together using fabric from my stash. As you can see, a secondary pattern, the four-patch, is formed.
![P_20150829_234457_1[1]](https://thebiasedge.files.wordpress.com/2015/08/p_20150829_234457_11.jpg)
Materials:
6 Fat Eighths of Fabri-Quilt fabric in Watermelon Summer palette
Cutting:
| Fabric colour | Shape to cut | Size to cut | Number to cut |
| Coral | Square | 4″ x 4″ | 2 |
| White | Square | 4″ x 4″ | 2 |
| Lapis Blue | Square | 3 1/2″ x 3 1/2″ | 2 |
| Chartreuse | Square | 3 1/2″ x 3 1/2″ | 2 |
| Turquoise | Square | 2 1/2″ x 2 1/2″ | 16 |
| Aqua | Square | 2 1/2″ x 2 1/2″ | 16 |

Method:
Sewing Half-Square Triangles (HST)
- Place one 2 1/2″ x 2 1/2″ Turquoise coloured square and a 2 1/2″ x 2 1/2″ Aqua coloured square together right sides facing, matching all four sides of the squares. The squares should be one on top of the other, wrong sides facing out. Using a pencil, draw a line diagonally from the top right-hand corner of the square to the bottom left-hand corner as follows:


- On the right-hand side of the drawn line, sew a straight line 1/4″ from the drawn line. (You are sewing the 2 squares together), Turn the square around and on the other side of the drawn line, sew another straight line 1/4″ from the drawn line.


- Using a pair of scissors or a ruler and rotary cutter, cut the sewn squares diagonally on the drawn line apart like this:

You will get 2 HSTs
- Press the HSTs open.

- Repeat Steps 1 to 4 for the rest of the fifteen Turquoise coloured and fifteen Aqua coloured squares.
When you have completed Step 5, you should have 32 Turquoise/Aqua HSTs.
6.Trim all the 32 HSTs down to 2″. You can use a square ruler with a diagonal line.


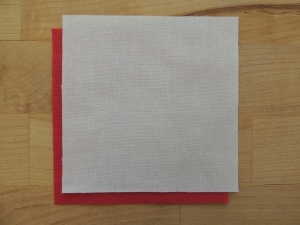
- Place one 4″ x 4″ Coral coloured square and one 4″ x 4″ White coloured square together right sides facing, matching all four sides of the squares. The squares should be one on top of the other, wrong sides facing out. Using a pencil, draw a line diagonally from the top right-hand corner of the square to the bottom left-hand corner as follows:


- On the right-hand side of the drawn line, sew a straight line 1/4″ from the drawn line. (You are sewing the two squares together), Turn the square around and on the other side of the drawn line, sew another straight line 1/4″ from the drawn line
.

- With ruler and rotary cutter, cut the sewn squares diagonally on the drawn line. You will get 2 HSTs:

- Press the HSTs open.
- Repeat Steps 7 to 10 for the remaining Coral coloured square and White coloured square.
- Trim the 2 Coral/White HSTs down to 3 1/2″ x 3 1/2″. You can use a square ruler with a diagonal line.


Before we start sewing up the block, check that you have the following basic units:
Squares
Lapis Blue 2 units 3 1/2″ x 3 1/2″
Chartreuse 2 units 3 1/2″ x 3 1/2″
Half Square Triangles (HSTs)
White/Coral 4 units 3 1/2″ x 3 1/2″
Aqua/Turquoise 32 units 2″ x 2″

Sewing Chevrons
- Sew 4 Turquoise/Aqua HSTs together to form a chevron like this:

To sew the chevron, first take 2 HSTs

and place one on top of the other HST right sides facing each other

Sew the 2 HSTs together.

Press the 2 HSTs open.

Next, take the other 2 HSTs,

place one on top of the other right sides facing each other

Sew the 2 HSTs together

Press the 2 HSTs open

You should now have these 2 parts:

You will sew the 2 parts together. When I first sewed my prototype, my seams were ironed to one side. This makes the intersection of the seams very bulky as I sewed the 2 parts together. When Yvonne sewed my block (with the Fabri-Quilt fabric), she opened up the seams and this reduced the bulk at the point where the seams intersect. Thanks Yvonne for this tip.

Press open and you will have a chevron measuring 3 1/2″ x 3 1/2″
14, Repeat Step 13 until all Turquoise/Aqua HSTs are used up. You should have 8 chevrons, each measuring 3 1/2″ x 3 1/2″.
- Sew the 4 Coral/White HSTs together to form a chevron like this:

To sew the chevron, first take 2 HSTs

Place 1 HST on top of the other HST right sides facing each other.

Sew the 2 HSTs together.
Press the 2 HSTs open.

Next, take the other 2 HSTs

Place one on top of the other right sides facing each other.

Sew the 2 HSTs together.
Press the 2 HSTs open.

You should now have these 2 parts:

Sew the 2 parts together. Before sewing them together, press open the seams of each of the part (refer to Step 13 above when we sew the Turquoise/Aqua chevron). After sewing the 2 parts together, press open. Your chevron should measure 6 1/2″ x 6 1/2″.
If you manage to get to this far, you should have the following:

Piecing the Block
- Sew a Lapis Blue square to a 3 1/2″ x 3 1/2″ Turquoise/Aqua chevron as follows:

- Sew the Chartreuse square to another 3 1/2″ x 3 1/2″ Turquoise/Aqua chevron as follows:

- Sew the 2 parts that you had sewn in Steps 16 & 17 together and you will get the following:

- Repeat Steps 16 to 18 with the remaining Lapis Blue square and the remaining Chartreuse square, swapping the position of the Lapis Blue square and the Chartreuse square.

You will now have these:

20: Sew a 3 1/2″ x 3 1/2″ Turquoise/Aqua chevron to another 3 1/2″ x 3 1/2″ Turquoise/Aqua chevron as follows:

- Repeat Step 20 with the remaining two 3 1/2″ x 3 1/2″ Turquoise/Aqua chevrons. You will now have 2 sets of these:

- Sew the 2 sets of chevrons that you have completed in Steps 20 & 21 to the sides of 6 1/2″ x 6 1/2″ Coral/White chevron as follows:

. You now have 3 parts:

- Sew these 3 parts together and Ta-Da, we have our Chevron among the chevrons

To download a pdf version of the tutorial, click Chevron among chevrons – a tutorial
We want to thank the hosts of this blog hop for all their hard work. Thank you Yvonne @ Quilting Jetgirl, Stephanie @ Late Night Quilter, Cheryl @ Meadow Mist and Terri Ann Swallow @ Childlike Fascination. We also want to thank Fabri-Quilt for sponsoring this blog hop by providing the fat-eighth fabrics that we used when we design the blocks. Not only that, they are also sponsoring the giveaway of fabric. Do hop over to our host for today (3 September) Terri Ann Swallow @ Childlike Fascination for the giveaway. Don’t forget to also visit the other bloggers who are posting their tutorials for the 12 1/2″ x 12 1/2″ block today.
- Robyn of Hoops & Thimbles
- Helen of Midget Gem Quilts
- Jinger of Trials of a Newbie Quilter
- Anja of Anja Quilts
- Kathryn of Upitis Quilts
- Mary of Quilting is in my Blood
- Emma of My Handmade Home
- Francine of Mocha Wild Child
- Dina of Living Water Quilter
- Deb of The Farmhouse Quilter
- Lori of SewPsyched!
- Amy of 13 Spools
- Denise of CrafTraditions
- Sandra of The Bias Edge
- Sandra of One Million Stitches
I always prewash my fabric before I use them. Therefore, I recommend that you prewash the fabric with like colours before you start your project. Enjoy!

I love that block!! Such a clever use of all of the fabric!
LikeLiked by 1 person
Great block with lots of potential fabric choices. Well done.
LikeLiked by 1 person
Such a great block. The chevrons make me think of waves in the ocean. I have to say our hop leaders are the best. It’s wonderful that you got to work with Yvonne to help with the time crunch. Congrats on your block and the tutorial!
LikeLike
What a fun block. Love your color choices.
LikeLiked by 1 person
Love those bloc loc rulers!!
LikeLiked by 1 person
Those bloc loc rulers belongs to Yvonne of Quilting Jetgirl. Remember she was the one who helped me sew up my block and took those photos? Actually this is the first time I see these bloc loc rulers. I find them very interesting. Will definitely check them out. I have a soft spot for specialty rulers. LOL
Sandra
LikeLike
Pingback: Fabri-Quilt New Block Blog Hop and Giveaway - Hoops & Thimbles
Pingback: 12" String Showcase Quilt Block Tutorial
Winderful block and thank goodness for Bloc-Loc! Great tutorial!
LikeLike
I love scrappy quilts too! Your double chevrons are so fun. Great block!
LikeLiked by 1 person
This is a great block!!! Your photos and tutorial are impeccable! Nice job! Great teamwork between you and Yvonne in overcoming a geography obstacle!!!
LikeLiked by 1 person
The excellent photos are the result of Yvonne’s photography skills. The blog hop hosts, Yvonne, Cheryl, Stephanie and Terri are great mentors.
Sandra
LikeLike
What a nice block. I love the tutorial. Thanks
LikeLiked by 1 person
Thank you for your encouragement.
Sandra
LikeLike
Wow, you are fantastic at showing us how to make this wonderful block. Thanks so much
LikeLiked by 1 person
Thank you Donna.
Sandra
LikeLike
GreAt instructions to a really neat block – thank you!
LikeLiked by 1 person
I appreciate your encouragement. 🙂
Sandra
LikeLike
Pingback: The 2015 Fabri-Quilt new block blog hop | One million stitches …
Pingback: Day 4: Fabri-Quilt New Block Blog Hop | Wanda's Life Sampler
What a creative idea. Great block.
LikeLiked by 1 person
Chevrons among Chevrons is a awesome block. The opportunity to use a variety of bold solid colors or a two tone quilt will offer nice quilt options. I hope to see a quilt one day. Yvonne is kind and good quilt blog mentor.
LikeLiked by 1 person
Dena. I am always fascinated when I look at your fmq. You are an inspiration to me. I have a lot to learn from you and the many talented quilters in this blog hop. Thanks for the encouragement. 🙂
Sandra
LikeLike
Pingback: Fabri-Quilt New Block Blog Hop–Taffy Pull | Quilting is in my Blood
There is something very playful and lighthearted about this block that makes it appealing. Thanks for the tutorial on how to make those chevrons – one never knows when one is going to need to do some chevrons, right? Great work!
LikeLike
I learnt a lot from the blog hop. The hosts were great mentors. I especially appreciate Yvonne’s help in this tutorial. Thanks for your encouragement
Sandra
LikeLike
Love this one too… so many blocks – so many thanks that Football Season is starting and my husband will be glued to the TV. crystalbluern at onlineok dot com
LikeLiked by 1 person
Yes we have so many talented quilters. Thanks Debra for your encouragement.
Sandra
LikeLike
Excellent block that you have created. Your tutorial was wonderful also. Thank you for sharing and have a wonderful creative day!
LikeLiked by 1 person
What a wonderful block, Sandra. Making something with a chevron pattern has been on my quilty list for awhile. Making this block might very well scratch that itch! Take care, Mary
LikeLiked by 1 person
Thanks for the encouragement.
LikeLike
No doubting the name on this one! Those chevrons look great! Well done.
LikeLiked by 1 person
Wow. I saw your blocks. Creating 2 blocks with the 6 fat eighth fabric is brilliant. Thanks for your encouragement
LikeLike
i love chevrons!
LikeLike
Sorry for the late response. I love your block. It’s wonderful that you and Yvonne worked so closely on this. I feel that your collaboration really embodies the best bits of the New Bloggers group.
LikeLiked by 1 person
Yes. I really like the collaboration with Yvonne. She is a great mentor. Thanks for your encouragement and for teaching me how to insert link into my posts. 🙂
LikeLike
If completely forgotten that I’d helped you with the links, but I knew there was a reason that I considered you a friend. I’m glad to have helped.
LikeLiked by 1 person
Thank you Sandra for the great tutorial in making your “WOW” block. It is very dazzling.
LikeLiked by 1 person
Thanks My:)
LikeLiked by 1 person
Super fun little geometrics! As so many of us have found, the secondary designs really stand out with some of these blocks.
LikeLiked by 1 person
Very nice and unique! I like the larger chevron surrounded by smaller ones.It is very effective and the block really pops with life.
LikeLiked by 1 person
Thanks Lisa:)
LikeLike
Pingback: 2016 Finish-A-long Q2 Goals | The Bias Edge